

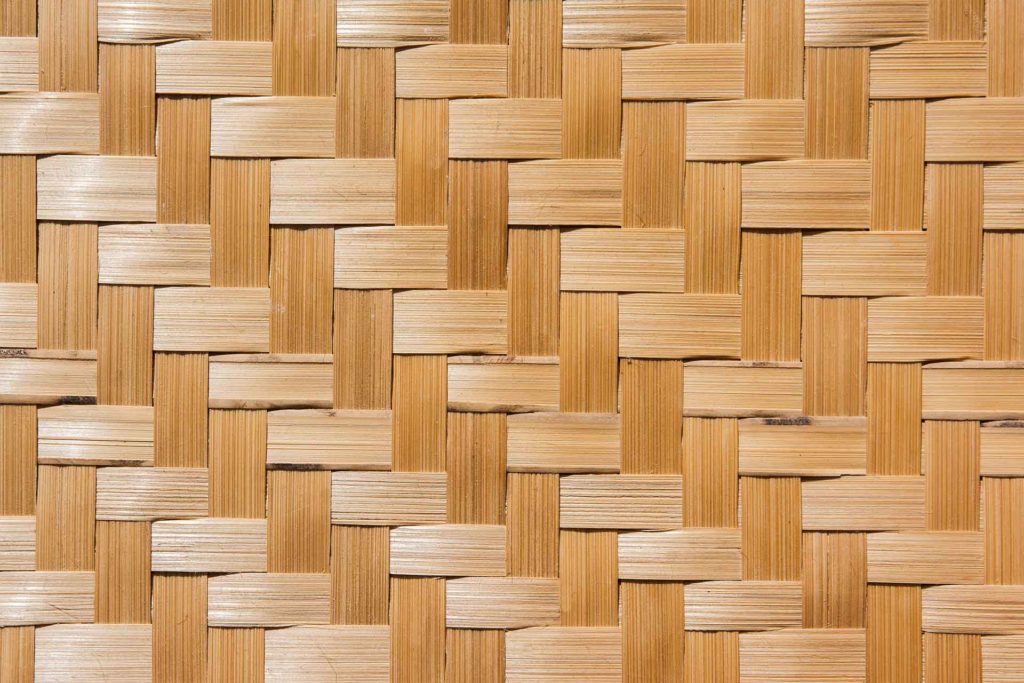
Installing ONETHATCH® synthetic bamboo matting is a simple, DIY-friendly job. Seal the cut line with an electric plastic welder, cut with scissors, glue the sheet to a backing board with contact cement, and add a staple every 30 cm (12 in). This guide shows how to install bamboo matting on walls, ceilings and tiki bar fronts, how to hide the seams, and how to keep your tropical matting looking fresh for years.
Our synthetic matting panels come as 4 × 8 ft (1.22 × 2.44 m) sheets of woven HDPE that weigh about 5.1 kg (11.2 lb) each, so they are easy to handle and cut on site. For large projects, the same weave is supplied in 1220 mm × 50 m rolls. Here is how to install faux bamboo matting for walls or ceiling throughout your home or business, using the artificial bamboo matting installation method we recommend.
What you need
- ONETHATCH bamboo matting sheets (a 4 × 8 ft sheet covers 32 sq ft / 3.0 m²)
- A backing board: 4–6 mm plywood is enough
- Contact cement and a roller or spreader
- A staple gun and staples
- An electric plastic welder, sharp scissors, a tape measure, a straightedge and a marker
- Trim for the edges and, if you like, the joints: a wooden trim or a half-round molding such as our synthetic bamboo half-rounds, 40 or 50 mm wide
Step 1: Prepare the backing board
ONETHATCH matting always goes on a backing board, and plywood 4–6 mm thick is enough. Cut the plywood to size and lay it on a flat work table, so you have a flat, solid surface to work on. Plan the layout so the sheet joints fall where you want your trim lines, and add an allowance for cutting when you order.
Step 2: Measure, seal and cut
Measure the area and mark the cut line on the sheet with a straightedge. Run an electric plastic welder along the line to fuse the HDPE strands together, then cut along the sealed line with scissors. Sealing first stops the strands loosening at the cut edge, so every edge stays neat. Cut openings for lights, fans, vents and sprinkler heads the same way.
Step 3: Glue the matting to the board
Coat the back of the matting with contact cement, following the adhesive maker’s instructions for coverage and drying time. Line the sheet up carefully, then press it onto the backing board with firm, even pressure over the whole surface, working from the centre out.
Step 4: Staple the panel in place every 30 cm (12 in)
Lift the finished panel into place and staple it through the matting and plywood into the wall studs, ceiling joists, battens or bar frame, with a staple every 30 cm (12 in). Start at the corners, continue along the edges, then work across the middle of the panel. On a ceiling, have a helper hold the panel in place while you staple it. In covered outdoor areas, use corrosion-resistant staples.
Step 5: Hide the seams and finish the edges
Keep the weave running the same way on every sheet. Cut and trim the meeting edges neatly, then weave the two sheets together at the joint so the seam disappears into the pattern. If you prefer a framed look, cover the joints with a wooden trim or a half-round molding instead. Finish the outer edges and corners with trim. Our synthetic bamboo poles and half-rounds complement the woven texture and frame the matting like a classic tiki bar.
Bamboo wall matting, ceilings and bar fronts
Walls. For bamboo wall matting on feature walls, wainscoting or the wall behind a bar, follow steps 1 to 5 and staple the finished panels to the wall studs. The result looks like faux bamboo wall paneling with the layered texture of a natural weave, and it is a simple woven bamboo wall covering installation for DIY projects.
Ceilings. When installing matting on a ceiling, glue the matting to the plywood first, then lift each panel up and staple it to the joists or battens. For a woven bamboo ceiling between exposed rafters, cut the plywood and matting to fit each bay and finish the edges against the rafters with wooden or half-round trim.
Tiki bar fronts and furniture. For a tiki bar wall covering installation, glue the matting to a plywood panel, staple the panel to the bar front, and trim the top and corners with half-rounds. The same method works on cabinet doors and other vertical furniture faces. Matting is made for walls, ceilings and vertical faces, not for floors, bar tops or countertops.
Need rigid artificial bamboo panels instead of a flexible mat? See our bamboo wall panels.
Indoors and in covered outdoor areas
ONETHATCH matting suits indoor rooms and covered outdoor areas such as patios, porches, palapas and under tiki bar canopies. The HDPE weave passed 5,000 hours of ASTM G155 accelerated weathering (Micom Laboratories), and it does not soak up water or salty sea air, so salt and dirt wipe off. Keep it under a roof: it is a wall and ceiling finish, not a roofing material.
Fire rules for commercial projects
For restaurants, hotels and other commercial interiors where the code calls for a rated finish, order the fire-retardant version of the matting: it is rated ASTM E84 Class A and has passed NFPA 286. The standard version carries no fire rating, so specify the fire-retardant version with your quote, and confirm your project’s requirements with your designer or code official.
How to clean and maintain synthetic bamboo ceilings and walls
ONETHATCH matting needs no staining, sealing or pest treatment: to clean a bamboo ceiling or wall, simply wipe it with a damp cloth. The 20-year limited warranty covers rot, delamination of the woven strands, UV degradation and, in the first 10 years, base-color fading.
Frequently asked questions
How do you attach bamboo matting to a wall?
Glue it to a plywood backing board with contact cement, then staple the panel to the wall. Coat the back of the matting with contact cement, press it onto 4–6 mm plywood, then staple the finished panel to the wall studs every 30 cm (12 in).
How do you cut a bamboo mat without loose edges?
Seal the cut line with an electric plastic welder, then cut with scissors. The welder fuses the HDPE strands along the line, so the weave stays tight at the edge.
How do you install a bamboo mat on a ceiling?
The same way as on a wall, with a helper to hold each panel. Glue the matting to the plywood with contact cement first, then staple the panel to the joists or battens every 30 cm (12 in), and hide the joints by weaving them together or covering them with trim.
How many sheets of bamboo matting do I need?
Divide the area by 32 sq ft (3.0 m²) per 4 × 8 ft sheet, then add an allowance for cutting. A 12 × 16 ft ceiling takes 6 sheets before that allowance. Send us your plan and we will check the quantity with your quote.
Is this how you install natural lauhala cabana matting too?
Mostly, yes. Installers of natural lauhala and bac bac matting also use a plywood backing, contact cement and staples, and they often tape the back of the mat before cutting, because a natural weave cannot be heat-sealed. ONETHATCH synthetic matting adds a heat-sealed edge and needs no varnish or sealer afterwards.
Ready to start? See colours and sizes on our synthetic bamboo matting page or the ONETHATCH Woven Mat product page, and send us your plan for a project quote.
 7 reasons to choose synthetic palm thatch
 Kenninji-Gaki, the classic Japanese bamboo fence
 How to install ONETHATCH PALM (NIPA), step by step
 English
 Japanese
 Arabic
 Spanish
 French
 Portuguese
 Italian
 German
 Chinese (China)
 Thai
 Vietnamese
 Indonesian
 Korean
 Chinese (Taiwan)
 Russian